How to Remove Old Fence Posts and Concrete Footings
The post above ground is usually the easy part. The buried concrete, roots, utilities, limited access and disposal plan determine whether removal is a hand-tool job or a good use for a compact excavator.
Remove the fence panels first, contact 811 before disturbing the ground, identify private lines, then expose each footing before trying to move it. Loose posts may come out with hand tools. For multiple posts or substantial concrete footings, a mini excavator can open the soil, handle freed debris and support controlled removal. Break oversized footings only after they are exposed and the surrounding area is understood.
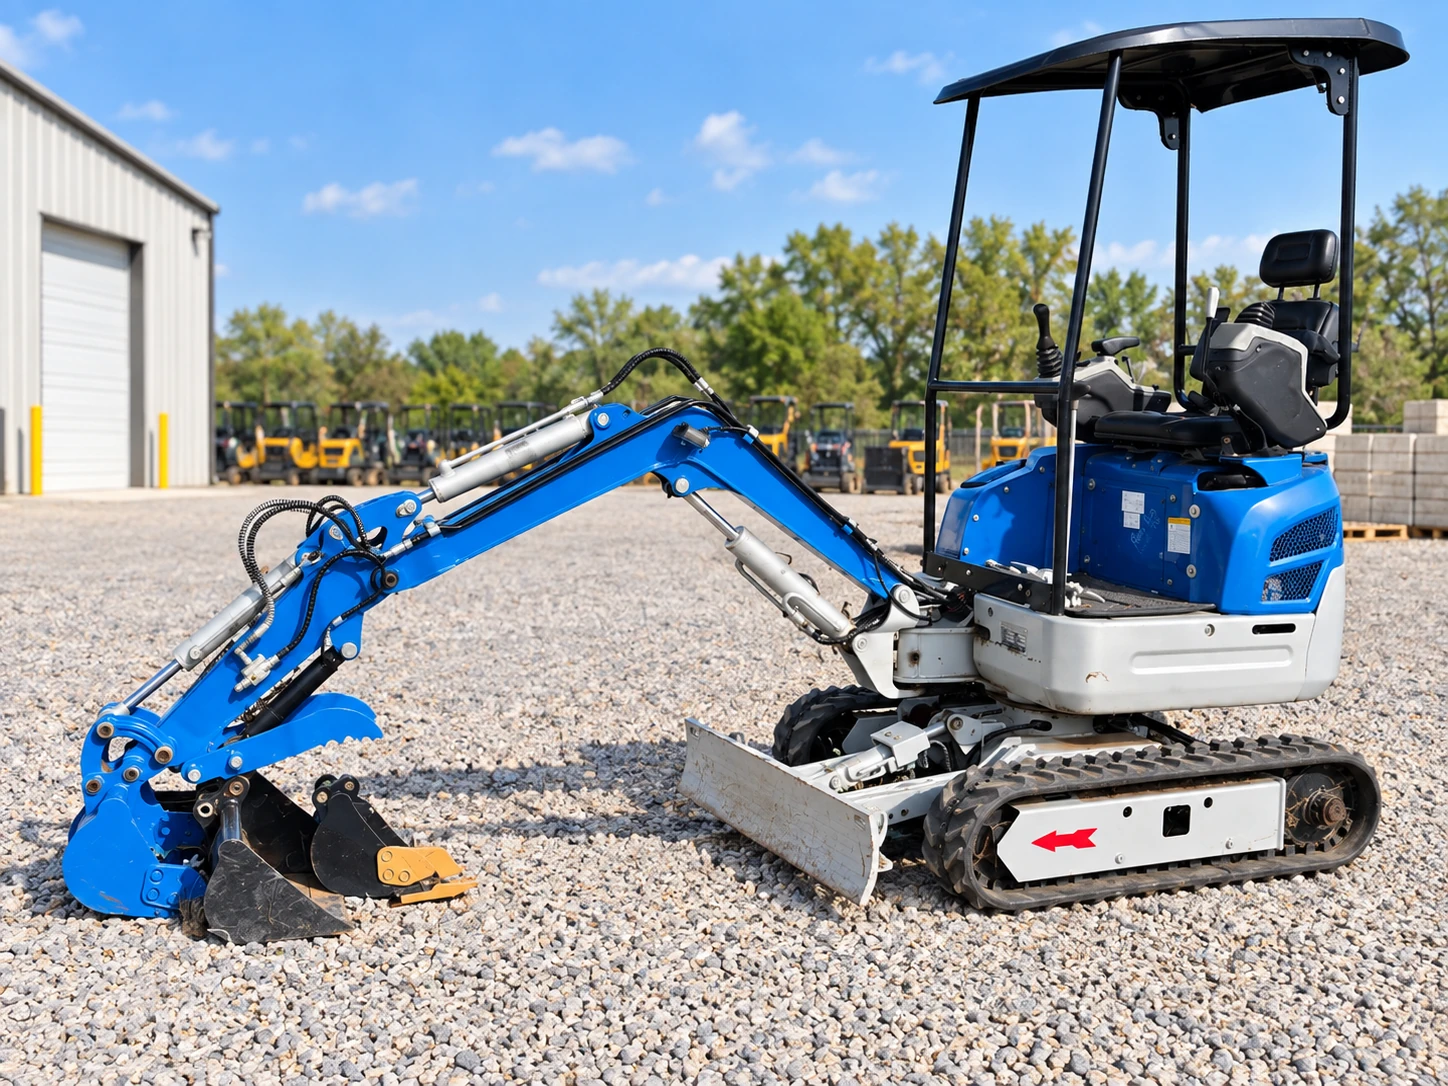
The RIPPA NDI15 mini excavator is the best fit in Noble’s current lineup for tight-access fence-post removal. It has expandable tracks, a hydraulic thumb, a swing/offset boom and an included 16-inch digging bucket. The current page lists the machine at approximately 40.5–41 inches minimum width and recommends a clear gate opening of 42 inches or more. A hydraulic concrete breaker is available for $100 per day when exposed concrete needs to be reduced into manageable pieces.
Decide What Actually Needs to Come Out
Start with the next use of the space. If a new fence will follow the old line, buried concrete can block new post locations or force an awkward layout. If the area will become a garden bed, drainage route, walkway or open lawn, a footing left just below grade may interfere later. On the other hand, removing every ounce of concrete is unnecessary when an abandoned footing is outside the future work and can remain safely buried.
Mark the new layout before committing to removal. New posts do not always belong in the exact old holes, especially if the fence alignment, gate width or post spacing will change. A measured plan tells you which footings are true obstacles and which can be left alone. It also prevents spending machine time on concrete that does not affect the project.
Inspect the visible fence before touching the soil. Note metal brackets, screws, wire, nails and sections under tension. Remove panels, rails, gates and loose hardware first. Separate reusable material from waste and keep sharp debris out of the equipment route. A clear work zone gives the operator an unobstructed view of each post and keeps wire from wrapping around tracks or attachments.
Why Fence-Post Footings Can Be Difficult
A post may look small above ground while sitting inside a much larger mass below it. The concrete may be irregular, bell-shaped at the bottom, tied to roots or surrounded by compacted soil. Rot can also leave the wood disconnected from the footing, so pulling on the post removes only the visible portion. Until the perimeter is exposed, the size and condition are guesses.
That is why a straight upward pull is rarely the best first move. Digging around part of the footing reveals its dimensions and creates space for soil to release. It also shows whether a root, irrigation line, landscape cable or other obstacle changes the plan. If controlled pressure does not move the footing, expose more rather than escalating force blindly.
A hand-dug approach can work for one or two small footings in loose ground. A digging bar, shovel and appropriately rated lifting setup may be sufficient, provided every component and anchor point is used within its limits. Multiple posts, large concrete masses, hard ground or a long fence line quickly turn the work into repeated excavation and heavy debris handling—the parts a mini excavator is designed to make easier.
Plan Access Before Reserving a Machine
Measure the complete route from delivery or pickup access to the farthest footing. The narrowest gate is only one constraint. Check hinge pins, latch hardware, air-conditioning equipment, retaining-wall edges, tree trunks, overhead branches, roof overhangs and the turning room on both sides of a passage.
The RIPPA NDI15 rental page lists an approximate minimum width of 40.5–41 inches with the undercarriage retracted and recommends a 42-inch-or-wider clear gate. That number is a starting point, not permission to squeeze through a measured 42-inch obstacle without checking the route. Allow working clearance and remember the machine needs enough space to expand, stabilize and swing safely after it reaches the yard.
Also plan where the removed material will go. Concrete, soil, treated wood, metal and mixed fence debris may need different handling. Do not pile heavy footings where they block the machine’s exit or overload a lawn edge, deck, trailer or container. Estimate the number of posts and arrange an appropriate disposal destination before digging.
Contact 811 and Identify Private Lines
Fence lines often run near utilities because both follow property edges. Texas811 says homeowners or contractors must contact 811 at least two business days before digging, excluding weekends and holidays—even in a private backyard. Wait for the locate process and review the responses before work begins. Preserve the marks and the ticket information while the project is active.
A public locate does not identify every buried item on private property. Texas811 explains that some facilities after the meter or main may be private. Irrigation, low-voltage lighting, pool equipment, septic components, private electrical feeds and other owner-installed lines may require a separate private locator or the property owner’s records. Do not use old fence alignment or a neighbor’s memory as a utility map.
If a marked or suspected line crosses the work zone, change the machine plan and use the precautions required by the facility owner and applicable rules. An operator cannot make an unknown utility safe. Locating is a project-planning step, not a formality completed after equipment arrives.
A Practical Fence-Post Removal Workflow
- Confirm the new use. Mark the new fence or landscape layout and identify which old footings must be removed.
- Strip the fence. Take down panels, rails, wire, gates and hardware so the work zone is visible and clean.
- Complete utility locating. Contact 811, wait the required period, review responses and arrange private locating where necessary.
- Measure access and stage disposal. Confirm the entire machine route and reserve a place for concrete, soil, metal and wood.
- Expose the footing. Remove soil from one or more sides until its size, shape and nearby obstacles are clear.
- Test controlled movement. Work the soil away and determine whether the post and footing can be freed without sudden force.
- Reduce oversized concrete if appropriate. Use a suitable method only after the footing and surrounding area are exposed.
- Handle debris deliberately. Keep people away from the swing area and place freed material on stable ground.
- Backfill for the next step. Remove unsuitable debris, place appropriate fill in manageable layers and leave the area ready for the new project.
How the Mini Excavator Helps
Expose the footing instead of pulling blind
The included 16-inch digging bucket can open the soil beside a footing so the operator can see what is resisting removal. Short, deliberate excavations are preferable to sweeping passes along an unknown fence line. Keep the utility marks visible and preserve enough undisturbed ground for the machine to remain stable.
Handle freed posts and debris
The hydraulic thumb can help grip roots, brush, loose posts and manageable concrete pieces after they have been separated. It is a handling aid, not a promise that the excavator can lift every intact footing. Weight, shape, reach, machine position and ground stability all matter. Keep bystanders clear and never allow anyone under raised material or between the machine and a fixed object.
Work near a fence line with better positioning
The swing/offset boom can help position the digging end without constantly moving the tracks, which is useful along straight fence runs and near obstacles. It does not eliminate clearance requirements. The operator still needs room for the boom, bucket, counterweight and material being handled.
When a Hydraulic Concrete Breaker Makes Sense
Noble’s current RIPPA NDI15 page lists a hydraulic concrete breaker for $100 per day. A breaker can help reduce an exposed footing into pieces that are easier to handle or dispose of. It is most useful when the concrete cannot be freed intact without excessive excavation or when an intact mass would be awkward to load.
Expose the footing before using an impact attachment. That confirms where concrete ends and shows nearby paving, foundations, irrigation and utilities that could be damaged. Do not treat the breaker as a tool for probing into unknown ground. Follow the machine and attachment instructions, use appropriate personal protective equipment, control flying debris and stop if the setup or material is outside the equipment’s safe operating limits.
Breaking concrete also changes the disposal job. Small pieces may be easier to move, but they create more sharp edges and loose fragments. Have a stable loading area and keep the work zone clear. If the footing is close to a structure, utility or finished surface, operator service or a different removal method may be the better decision.
DIY Rental or Operator Service?
A DIY rental can make sense when the yard is open, the utilities are clearly addressed, the footings are separated from structures and the renter is comfortable operating compact equipment. The current RIPPA page lists $150 for up to four hours and $200 for up to eight hours. The rental includes the hydraulic thumb and 16-inch digging bucket.
Ask about operator service when access is tight, concrete must be broken, footings are beside a house or retaining wall, the route is sloped, or the renter has not operated an excavator. The current page lists operator service at $100 per hour with no minimum. An operator can run the machine, but the property owner still needs to provide accurate project information, complete utility planning and decide how debris will be handled.
Time the rental around preparation, not around demolition alone. Fence panels should be down, locate responses complete, access cleared and disposal ready before the rental clock starts. The current page says the four- or eight-hour rental period begins when the customer takes possession at pickup or when Noble arrives for delivery or operator service.
Common Mistakes to Avoid
Attaching to the visible post and yanking
The post may be rotten, the footing may be wider than expected, and a sudden release can create uncontrolled movement. Expose the footing, understand the resistance and use a controlled method.
Letting someone guide from beside the bucket
OSHA identifies struck-by and caught-in-or-between hazards around moving equipment. Establish a clear exclusion area and one communication plan. No person should stand between the excavator and a fence, wall, tree or other fixed object.
Forgetting the debris volume
Concrete footings are dense and awkward. A row of posts can produce more weight than expected even when the above-ground fence looks light. Match the disposal method to the actual material and do not guess at trailer or container capacity.
Backfilling with demolition debris
Wood scraps, wire and large concrete pieces can create voids and future obstructions. Remove the debris, use fill suited to the next use and compact it in manageable layers. If a new post will occupy the area, follow the new fence design rather than relying on the old hole.
Plan the New Fence Separately
Removal and replacement are related but different jobs. The depth, width, spacing and material for new post holes depend on the fence design, loads, soil conditions and manufacturer or project requirements. Do not assume the old footing was correct simply because it remained in the ground.
For the next phase, read How Deep Should Fence Post Holes Be? If the project also involves a drainage trench or moving material through a yard, the French drain equipment guide and backyard gravel-moving guide explain how to plan those operations without turning this removal job into a larger unplanned project.
Noble Construction serves Leander and nearby Central Texas communities with equipment rental and operator options. Browse the Project Advice hub for more practical project planning before choosing a machine.
Frequently Asked Questions
Can a mini excavator remove old fence posts?
A mini excavator can expose buried concrete, loosen surrounding soil and handle many freed posts or footing pieces. Success depends on footing size, soil, access, nearby improvements and safe machine limits; it is not a guarantee that every footing can be pulled intact.
Do I need to remove the entire concrete footing?
Remove it when it conflicts with the new fence, landscaping, drainage or other planned work. If an abandoned footing can remain without creating a future obstruction, full removal may not be necessary, but verify the new layout before deciding.
Can I use a hydraulic breaker on fence-post concrete?
The RIPPA NDI15 rental page lists a hydraulic concrete breaker as an available attachment. It may help reduce an exposed footing into manageable pieces, but nearby utilities, structures, paving and the attachment’s operating limits must be considered first.
Do I need to contact 811 before removing fence posts in Texas?
Yes when the work disturbs the ground. Texas811 says homeowners or contractors must contact 811 at least two business days, excluding weekends and holidays, before digging. Private lines may need a separate private locate.
Should I rent a mini excavator or ask for an operator?
DIY rental can fit an open, clearly marked site when the renter is comfortable with compact equipment. Ask about operator service when access is tight, footings are close to utilities or structures, concrete must be broken, or the renter is unfamiliar with the machine.
Research & Sources
Measure the access and tell us what is buried.
Compare the mini excavator setup, attachment options and operator service before choosing a rental window.