How to Prepare an Area for a Small Retaining Wall
Good site preparation starts before excavation. Choose the wall system, establish finished elevations, reserve space for its base and drainage details, and plan where soil and imported materials will move.
Start with the selected retaining-wall system and its installation plan, not a generic trench size. Mark the face of the wall, base elevation, ends, steps and drainage outlet. A mini excavator is usually the best primary machine for cutting the wall area and handling soil; a mini skid steer can shuttle aggregate and relocate spoil. Excavate conservatively, protect undisturbed ground, verify elevations frequently and do not cover drainage or base problems with more material.
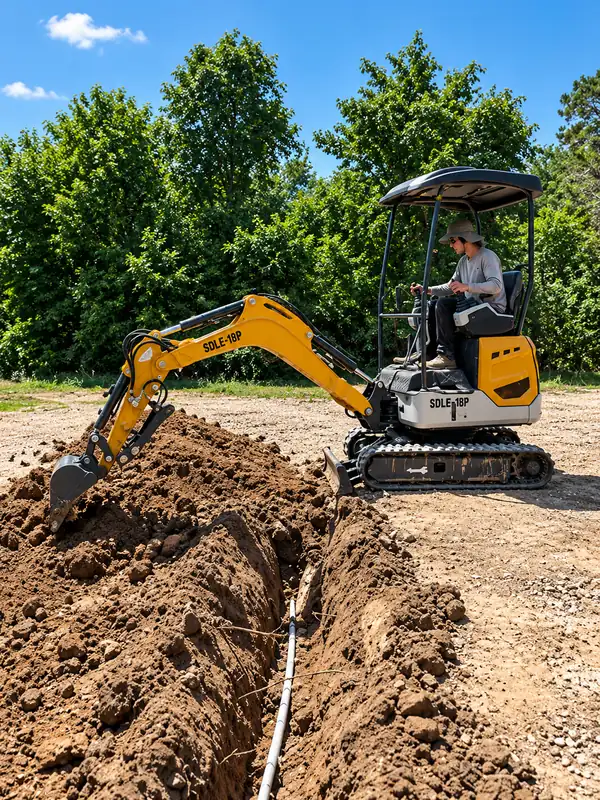
The SDLANCH SDLE18P mini excavator is a practical primary machine when the route has at least a 44-inch clear opening and the work area has room for controlled excavation. Its included 16-inch digging bucket handles general excavation, while the optional 30-inch cleanout bucket is listed at $20 per day for broader cleanup, grading and loose material. The ZJ-380 mini skid steer is the useful companion when the project involves repeated trips with base aggregate, drainage stone or excavated soil.
Choose the Wall System Before Choosing the Excavation
A retaining wall is not just a row of blocks against a cut bank. The wall product or construction method determines its base, buried portion, drainage space, setbacks, reinforcement and allowable configurations. The excavation must create room for that complete system. Digging first and buying blocks later often produces a trench that is too narrow, too deep or in the wrong position.
Obtain the current installation instructions for the exact wall product. If the wall supports a meaningful slope, driveway, structure, fence load or other surcharge, or if failure could damage people or property, get project-specific design help. Local permit and engineering requirements depend on the actual wall and site; verify them with the appropriate authority instead of relying on a generic height rule from the internet.
Use the design to build a material list and an excavation sketch. Include the wall face, buried courses, base, drainage aggregate, drain outlet, steps, corners and any reinforcement. Those elements control how far the machine must cut behind and below the visible wall.
Establish the Wall Line and Finished Elevations
Mark the visible face of the wall with stakes and string or another durable layout method. A garden hose can help visualize a curve, but transfer the final curve to measurable reference points before excavation. Mark both ends and every elevation change. If the wall steps, decide where each step occurs rather than improvising after the base is open.
Set a reliable elevation reference outside the excavation. Use a laser level, builder's level or another suitable method to record the planned base and finished top. Measuring from the existing ground alone can reproduce the same unevenness the wall is meant to correct.
Also mark the limit of disturbance. This line should account for the actual wall system, not just the block width. It helps the operator avoid removing extra soil, roots or stable ground that will later have to be rebuilt.
Plan Drainage Before Moving Soil
Water management is part of the wall layout. Identify surface runoff above the wall, the drainage zone behind it and where any drain outlet will safely discharge. Do not end a pipe at a location where water will erode the wall toe, saturate another slope or create a problem for a neighboring property.
The correct drainage aggregate, pipe placement, filter material and outlet details depend on the selected wall system and site. Follow its instructions or the project design. Do not assume that adding a pipe somewhere behind the blocks will correct a poorly graded site or unsuitable backfill.
Keep the outlet route open during excavation. A spoil pile, pallet of block or aggregate delivery can easily cover the low end of the drainage path and force the crew to move material twice.
Measure Access and Create a Material Route
Measure from the unloading area to the wall—not only the gate. The SDLE18P is approximately 43.3 inches wide, and Noble recommends at least a 44-inch clear opening. The RIPPA NDI15 mini excavator has an approximate minimum width of 40.5–41 inches, with a 42-inch-or-wider gate recommended. Check turns, roof overhangs, branches, utility equipment, slopes and the space needed to position the machine.
The ZJ-380 mini skid steer is commonly listed around 41–43 inches wide, while its bucket is approximately 44–45 inches wide depending on configuration. The bucket may therefore be the limiting measurement. Its current rental includes the general-purpose bucket only; no other attachments are offered.
Choose separate areas for excavated soil, base material, drainage aggregate and wall units. Keep pallets and delivery piles off the machine's turning area. Preserve a clear route out after the cut changes the shape of the site.
Excavate Conservatively
Remove vegetation, mulch and loose organic material from the wall footprint as the design requires. Save useful topsoil separately from subsoil and rock. Mixed spoil is harder to reuse, and forcing unsuitable material back behind a wall can create settlement or drainage problems.
Excavate the wall line in short, controlled sections. Stop above the final base elevation when machine work could disturb the bearing surface, then finish the grade carefully. Over-excavation replaces firm ground with fill that must be rebuilt and consolidated. If the bottom becomes soft, wet or disturbed, do not hide it beneath aggregate; determine the corrective method required by the wall system or designer.
Keep the machine on stable ground and away from unsupported excavation edges. Do not work beneath an overhanging bank or allow anyone into an excavation that has not been made safe for entry. OSHA identifies cave-ins as the greatest trenching and excavation hazard and advises keeping materials away from excavation edges.
Build the Base From a Verified Subgrade
After excavation, inspect the entire subgrade. Remove loose pockets, roots and debris. Confirm that the width and elevation match the selected system, including corners and steps. A string line and level checks are more dependable than judging the trench from the operator's seat.
Place the specified base material in manageable stages and consolidate it using the method required for the product and site. Do not invent a universal depth or compaction method: wall products, soil and loads differ. The goal is a uniform, stable surface at the correct elevation, not simply a trench filled with rock.
The first wall course depends on that base. Small elevation errors compound along the run and can make later courses visibly uneven. Take the time to verify the base before block placement begins; the excavator should not be waiting with its rental clock running while the layout is still being decided.
Where the Mini Excavator Helps Most
The excavator is best for controlled soil removal, reaching into the cut and placing spoil in an organized pile. The included hydraulic thumb can handle roots, rocks and debris that the bucket exposes. The front blade can help with light backfilling and rough cleanup after the wall system is installed.
Both Noble mini excavators currently rent for $150 for up to four hours or $200 for up to eight hours. Each includes a 16-inch digging bucket and hydraulic thumb. A 30-inch cleanout bucket is available for $20 per day, and a rake is available for $20 per day. A ripper tooth is also listed at $20 per day for stubborn ground. Select only the attachments the actual plan calls for.
The smaller RIPPA access target may help on a narrow route. The SDLE18P's listed 44-inch gate target should be measured against the entire path. Neither machine is a substitute for wall design, elevation control or careful hand finishing at the base.
Where the Mini Skid Steer Saves Labor
Retaining-wall preparation often involves repeated material movement rather than continuous digging. The ZJ-380 can carry aggregate from a delivery pile, relocate suitable soil and spread loose material near the work area. Its current rate is $125 for up to four hours or $175 for up to eight hours.
Two machines make sense only when the volume and route justify them. For a short wall with materials staged nearby, wheelbarrows may be simpler. For a longer route or a pile far from the excavation, the mini skid can keep the excavator focused on the cut.
A loaded machine should not travel against an unsupported edge or repeatedly pivot on vulnerable turf. Establish one travel lane, protect fragile surfaces where appropriate and keep people outside the operating area.
A Practical Work Sequence
- Select the wall system. Obtain its current installation requirements and any project-specific design.
- Verify approvals. Check local permit or engineering requirements for the actual wall and site.
- Lay out line and elevations. Mark the wall face, ends, steps, base and drainage outlet.
- Contact Texas811. Wait for responses and separately identify private facilities.
- Measure equipment access. Confirm the gate, full route, turns, slopes and work zone.
- Stage materials. Keep base aggregate, drainage material, blocks and spoil in separate locations.
- Excavate conservatively. Preserve stable ground and keep spoil away from the edge.
- Inspect the subgrade. Correct soft, wet or disturbed areas before covering them.
- Prepare the specified base. Place, consolidate and verify elevation as required by the system.
- Protect drainage space. Keep the outlet open and prevent soil from contaminating designated drainage material.
- Restore the site. Remove surplus, rebuild the intended surface grade and keep water from concentrating at the wall ends.
Call Texas811 Before Excavation
Texas811's homeowner guidance says the homeowner or contractor must contact 811 two business days, excluding weekends and holidays, before digging. Wait for affected utilities to respond, preserve the markings and respect the marked area during layout and excavation.
Public utility locating does not necessarily identify irrigation, septic components, low-voltage lighting, propane service or other private facilities. Those may require records or a private locator. A retaining-wall cut can cross shallow private systems even when the visible wall line appears clear.
Important: Do not shift the wall around a utility mark by guesswork. A route change affects the base, drainage, property layout and wall design; resolve it before digging.
DIY Rental or Operator Service?
DIY rental may fit a small, clearly designed project with open access, marked utilities and a renter experienced with compact excavator controls. Have the wall plan, elevations, spoil location and material deliveries ready before taking possession.
Noble currently lists operator service for either mini excavator at $100 per hour with no minimum. It is worth considering when the cut is near a house, fence, utility or slope; access is tight; elevation control matters; or the renter is unfamiliar with the equipment. The operator still needs the approved wall layout and excavation limits.
Customer pickup in Leander is free with appropriately sized and rated transport, and Noble may decline unsuitable transport. Delivery is available based on job-site location. For the mini skid, customer pickup also requires suitable rated transport; delivery and pickup are available by location.
Common Retaining Wall Preparation Mistakes
- Digging before selecting the wall. The cut does not leave room for the specified base, drainage or reinforcement.
- Following the existing ground. The base repeats an uneven surface instead of using controlled elevations.
- Over-excavating. Stable ground is removed and must be rebuilt with properly placed fill.
- Mixing topsoil and subsoil. Useful finish material becomes contaminated with rock and debris.
- Blocking the drainage outlet. Spoil or deliveries occupy the route intended for water.
- Guessing local requirements. The homeowner assumes a generic height rule applies to every site.
- Choosing attachments without a plan. Rental time and money are spent on tools the project does not need.
- Stacking spoil at the edge. Material loads the excavation and leaves no working room.
- Using equipment as a substitute for verification. The trench looks smooth, but elevation and width were never measured.
Planning a Retaining Wall Project in Jonestown
Before reserving equipment, gather the wall product instructions, layout sketch, planned elevations, access measurements, route photos, material quantities and spoil plan. Confirm who is responsible for design, permits, inspections and drainage decisions. That preparation makes the machine time productive.
Noble Construction serves Jonestown, Leander, Lago Vista, Cedar Park, Liberty Hill, Georgetown and surrounding Central Texas communities. Compare the SDLE18P and RIPPA NDI15 mini excavators, review the ZJ-380 mini skid steer, or return to the Project Advice hub.
Frequently Asked Questions
What machine is best for preparing a small retaining wall area?
A mini excavator is usually the primary machine for cutting the wall line, removing unsuitable material and placing soil where access permits. A mini skid steer is useful when aggregate, soil or blocks must be shuttled repeatedly between a delivery pile and the work area.
Can I dig the retaining wall base with a mini excavator?
Yes, when the machine can access the route and the excavation follows the selected wall system's plan. The operator should excavate conservatively, preserve undisturbed ground and leave final shaping and elevation checks for controlled hand or grading work.
How much room is needed behind a retaining wall?
There is no universal dimension. The required space depends on the wall product, drainage aggregate, drain pipe, reinforcement, soil and design. Select the wall system and obtain its installation requirements before marking the excavation.
Do I need to contact 811 before retaining wall excavation?
Yes. Texas811 says the homeowner or contractor must contact 811 two business days, excluding weekends and holidays, before digging. Private irrigation, septic components, low-voltage wiring and other private facilities may need separate identification.
Should I rent the equipment or ask for an operator?
DIY rental may fit a clearly designed, open site and an experienced operator. Ask about operator service when the cut is near utilities, buildings, fences or slopes; elevations must be controlled carefully; access is tight; or the renter is unfamiliar with compact excavators.
Research & Sources
- Texas811: Homeowner Guide—Call 811 Before You Dig
- Occupational Safety and Health Administration: Trenching and Excavation Safety