How to Backfill a Trench and Clean Up the Yard
Closing a trench is not just pushing the dirt back. The useful sequence is to approve and protect the installation, sort the spoil, place suitable material without damaging what is buried, and rebuild the surface for its intended use.
Inspect and test the installed pipe, conduit or drain before covering it. Use the specified material around that system, then replace suitable soil in manageable stages so large voids are not trapped. A mini skid steer is efficient for carrying spoil and placing it along an accessible trench; a mini excavator can provide more controlled placement in tight areas. Keep the final topsoil or surface aggregate separate until the structural backfill is complete.
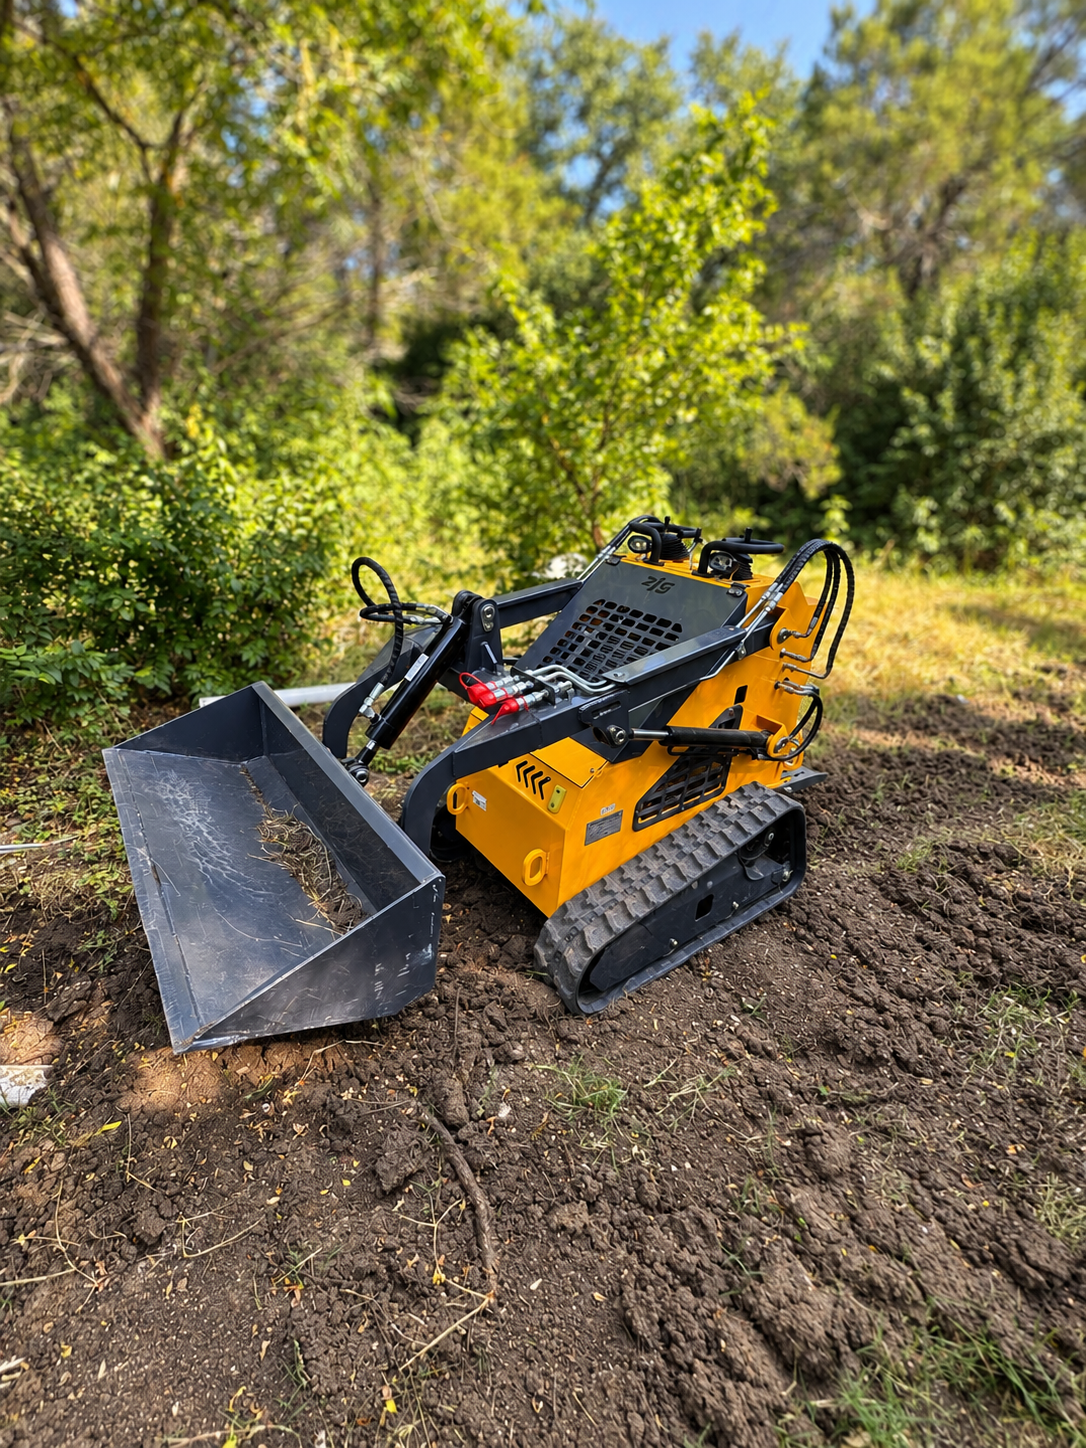
The ZJ-380 mini skid steer is the practical first choice when the main job is shuttling stockpiled soil, placing loose fill and cleaning up a residential route. Its general-purpose bucket is included, the machine is listed at approximately 41–43 inches wide, and the bucket is approximately 44–45 inches wide depending on configuration. If the trench is tight against a fence or the fill must be placed from one position, a RIPPA NDI15 or SDLE18P mini excavator can reach and place material more deliberately.
Approve the Installation Before Any Soil Goes Back
The cheapest time to correct a trench installation is while it is still visible. Before backfilling, confirm that the responsible installer has finished every connection, test and inspection required by the project. Photograph the open route and key junctions, record measurements from permanent landmarks, and save product information for buried components. A future owner or repair technician will benefit from knowing where the system actually runs.
Different installations need different checks. A gravity drain may need its line, outlet and connections confirmed. Conduit may need pull strings, caps or sweeps checked. Plumbing, electrical, septic and structural work can involve permits, inspections or trade-specific requirements. Do not cover work merely because the rental clock is running. The authority, installer or manufacturer responsible for that system should determine when it is ready to be concealed.
Remove tools, packaging and loose debris from the trench. Make sure pipe or conduit is supported as designed rather than bridging over a hollow spot. If water has entered the excavation, address the water and any disturbed support material before placing fill. Backfill should lock in a correct installation—not hide an unresolved problem.
The Material Next to the System Matters Most
The first material placed around a buried component often has the greatest effect on protection and support. Raw spoil containing roots, broken concrete, trash or large hard pieces can create point loads, damage a coating or leave voids. Some systems call for selected bedding, aggregate or other specified material around and above them. Follow the installation documents or the project professional’s direction instead of substituting whatever came out of the trench.
Place this initial material carefully enough that the pipe, conduit or drainage component does not roll, lift or lose alignment. Hand placement is often appropriate immediately beside vulnerable parts. Do not drop a full bucket directly onto an exposed system. Heavy equipment can speed the work after a protective zone has been established, but it is not a substitute for controlled placement near the installation.
Excavated soil can often be reused elsewhere in the trench if it is suitable and the project allows it. Break down manageable clods, remove vegetation and obvious debris, and keep wet, unstable or unsuitable material out of the backfill plan until someone qualified for the project has decided how it should be handled. If material was removed for pipe, bedding or imported fill, expect surplus spoil rather than trying to force every cubic yard back into the opening.
Sort the Spoil Before Moving It Twice
A clean trench closure begins when the trench is dug. Ideally, topsoil or finish gravel is stockpiled separately from subsoil and rock. If everything has already been mixed, pause and decide which material belongs deep in the fill, which can be screened or broken down, and which should leave the site. Pushing the entire pile across the yard first usually creates more cleanup.
Create three destinations
- Suitable backfill: material approved for the general fill zone and free of damaging debris.
- Finish material: saved topsoil, matching driveway aggregate, mulch or other material reserved for the surface.
- Surplus or unsuitable material: spoil that will be reused elsewhere, hauled away or managed separately.
Place the mini skid’s travel lane and receiving piles before loading the first bucket. Keep equipment off irrigation heads, septic components, soft landscaping and surfaces that cannot accept concentrated loads. Measure gates, corners and narrow passages, including the bucket—not only the machine body.
Backfill in a Controlled Sequence
- Document and release the work. Complete tests and required inspections, take photos and confirm that the trench may be closed.
- Protect the installed system. Place the specified bedding or initial cover carefully, working from both sides where required so the component remains supported and aligned.
- Add suitable general fill in stages. Place manageable amounts along the route rather than dumping one tall pile into a single section.
- Consolidate as required. Use the project’s specified method and keep force away from components that have not yet received enough protective cover.
- Watch for movement and voids. Stop if pipe, conduit, boxes, cleanouts or outlet features shift. Fill irregular spaces deliberately rather than bridging over them.
- Shape the subgrade. Leave the correct depth for topsoil, sod, gravel, mulch or other finish material.
- Restore drainage and access. Rebuild the surface so water does not collect along the former trench or run toward a building.
- Remove surplus and clean the route. Collect rock, packaging and displaced landscape material before final grooming.
There is no responsible universal lift thickness or compaction recipe for every residential trench. The correct method changes with fill type, moisture, buried system, trench geometry and final use. A lawn, gravel drive and area supporting pavement do not have the same performance requirements. Use the system manufacturer’s instructions and the project specification where one exists.
Why a Mini Skid Steer Helps With Cleanup
Backfill is a repeated material-handling job: load at the spoil pile, travel to the trench, place a small amount, return and repeat. The ZJ-380’s included general-purpose bucket suits that cycle better than hand-loaded wheelbarrows when the volume and access justify a machine. It can also carry surplus to a staging area and spread loose material before hand raking.
The mini skid should approach the trench only from stable ground. An open excavation can weaken the ground beside it, and a loaded machine adds weight near the edge. Work from a safe setback determined by site conditions rather than using the trench edge as a travel lane. Keep bystanders out of the machine’s path, use a spotter where visibility is limited, and never let anyone stand between the machine and a fixed object.
Noble currently lists the ZJ-380 at $125 for up to four hours and $175 for up to eight hours. Delivery is available based on location, and customer pickup requires properly rated transport. The current rental includes the bucket only; do not plan around unlisted attachments.
When the Mini Excavator Is the Better Backfill Tool
A mini excavator is useful when the stockpile is already beside the trench, access leaves no room to drive back and forth, or placement needs reach and control. The bucket can pull material into the opening in measured amounts, while the front blade can assist with light backfilling and rough surface cleanup. A 30-inch cleanout bucket is available for either Noble mini excavator at $20 per day and can move loose soil more efficiently than the included 16-inch digging bucket.
The SDLE18P is listed at 43.3 inches wide, with a 44-inch clear gate recommended. The RIPPA NDI15 has an approximate minimum width of 40.5–41 inches, with a 42-inch clear gate recommended. Measure the full working route and the space required to swing; passing through a gate does not prove the machine can work safely beside the trench.
Either excavator is currently listed at $150 for up to four hours or $200 for up to eight hours. Operator service is listed at $100 per hour with no minimum. Those rates and options come from the current rental pages and should still be confirmed for the planned date and site.
Plan for Settlement Without Creating a Mound Problem
Loose material occupies space differently from undisturbed ground, so an unmanaged trench can settle later. The answer is not to bury debris, overfill dramatically or drive directly over an insufficiently protected system. Use suitable fill, place it in manageable stages and consolidate it according to the installation and finished-surface requirements.
For a lawn, leave the proper depth for saved topsoil and sod or seed preparation. A modest final adjustment may be appropriate if the project method anticipates settlement, but a tall ridge can shed water sideways, scalp under mowing equipment and be difficult to remove after vegetation grows. For gravel, rebuild the intended aggregate section and match the surrounding drainage path rather than hiding soft fill under a thin cosmetic layer. Areas supporting vehicles, slabs or other improvements deserve project-specific backfill and compaction direction.
Inspect the route after watering or rainfall and again after use. Repair a developing low spot before it becomes a channel that concentrates runoff. If settlement is deep, sudden or accompanied by failed drainage, movement of a buried component or a void, investigate the cause instead of repeatedly topping the surface.
Restore the Surface, Not Just the Trench
Lawn and planting areas
Replace saved topsoil near the surface, remove stones that will interfere with mowing, and blend the edges into the existing grade. Keep the finished route from creating a berm or swale unless that shape is part of the drainage plan. Protect cleanouts, valve boxes and access points rather than burying them for appearance.
Gravel paths and driveways
Rebuild the underlying support before adding finish gravel. Match the surrounding crown or cross-slope so water does not collect in the repair. Reusing muddy aggregate as a finish layer usually leaves a visible, soft strip; reserve clean matching material for the top.
Mulch and decorative rock
Use soil to establish the intended subgrade, then replace landscape fabric or edging only where the original system calls for it. Finish with clean mulch or rock. Keep decorative material out of the structural fill unless the project specifically uses it there.
Keep Utility Information Active Through Closure
Texas811 says homeowners or contractors must contact 811 two business days, excluding weekends and holidays, before digging. Backfilling may be the last phase of the same excavation, so retain the ticket information, utility responses and visible markings until the work is fully closed. If the ticket has expired, marks are no longer clear, the route changes or cleanup will disturb new ground, contact Texas811 rather than guessing.
Public utility locating does not necessarily identify every private facility on the property. Irrigation, low-voltage wiring, septic components, propane service and other privately installed lines may require records or a private locator. A backfill machine can still damage an exposed or shallow private line even though the trench has already been dug.
Trench safety: OSHA identifies cave-ins as the greatest trench hazard and states that one cubic yard of soil can weigh as much as a car. Keep people out of an unprotected trench, keep heavy equipment and spoil away from unstable edges, and obtain qualified help when anyone would need to enter an excavation.
DIY Rental or Operator Service?
DIY rental can work when access is open, buried and exposed facilities are clearly identified, the installation has been released for cover, and the renter has experience controlling the machine. Write down the material destinations and finish elevations before the rental begins. A second person can watch clearances and keep the route free of people, but should never stand in a pinch point or under a raised load.
Ask about operator service for a mini excavator when the trench is beside a structure or fence, fill must be placed around exposed components, the swing area is restricted or the renter is unfamiliar with compact equipment. The operator needs the approved backfill plan; machine experience does not determine which material belongs around a pipe or whether an inspection is complete. Noble’s current pages list operator service for both mini excavators, not for the mini skid steer.
Common Backfill and Cleanup Mistakes
- Covering before approval. Tests, photos or a required inspection are skipped to save rental time.
- Dropping spoil onto the installation. Pipe or conduit moves, cracks or loses support.
- Burying unsuitable debris. Roots, trash and oversized hard pieces create voids or point loads.
- Mixing finish material into subsoil. Saved topsoil or clean gravel is unavailable when the surface is rebuilt.
- Dumping the full trench at once. Large voids become difficult to find and later settlement is more likely.
- Working too close to the edge. Machine weight is placed on ground weakened by the excavation.
- Guessing compaction requirements. A generic method is used despite a vulnerable system or load-bearing finish.
- Burying access points. Cleanouts, valve boxes and markers disappear beneath the final grade.
- Ignoring runoff after restoration. The former trench becomes a low channel toward a building.
Planning a Trench Cleanup in Jonestown
Before reserving equipment, estimate how much suitable backfill remains, how far it must travel, where surplus will go, and which finish material must be protected. Measure gates and turns at their narrowest points. Send route photos, surface conditions and dimensions when discussing delivery or machine choice.
Noble Construction serves Jonestown, Leander, Lago Vista, Cedar Park, Liberty Hill, Georgetown and surrounding Central Texas communities. Review the ZJ-380 mini skid steer, compare Noble’s RIPPA NDI15 and SDLE18P mini excavators, or return to the Project Advice hub.
Frequently Asked Questions
What is the best machine for backfilling a residential trench?
A mini skid steer with a general-purpose bucket is often the most efficient choice for carrying stockpiled soil and placing it along an accessible trench. A mini excavator can be better for controlled placement in tight areas and can use its front blade for light backfilling. Access, trench location and the installed system should decide the machine.
Can excavated soil go straight back into the trench?
Only if the material is suitable for the installation and the project requirements allow it. Remove trash, roots, oversized debris and other material that could damage the system or leave large voids. The zone around pipe, conduit or drainage components may require specified bedding or fill rather than raw trench spoil.
How do you reduce settlement after trench backfill?
Use suitable material, place it in manageable stages and consolidate it by the method required for the installed system and finished surface. Avoid dumping the full pile in at once or compacting directly against vulnerable components. Expect some final surface adjustment where the specification permits it.
Do I need 811 for backfilling after trench work?
Keep the existing locate ticket, utility responses and markings available while the excavation remains open. Contact Texas811 again if the ticket is no longer valid, markings are unclear or the work area changes and more ground will be disturbed. Private facilities may need separate identification.
Should I rent equipment or ask for an operator?
DIY rental may fit an open route, clearly identified facilities and an experienced operator. Ask about operator service for a mini excavator when access is tight, exposed systems are close to the work, placement must be controlled carefully or the renter is unfamiliar with the machine.
Research & Sources
- Texas811: Homeowner Guide—Call 811 Before You Dig
- Texas811: Utility Safety Questions and Private Facilities
- Occupational Safety and Health Administration: Trenching and Excavation Safety